|
|
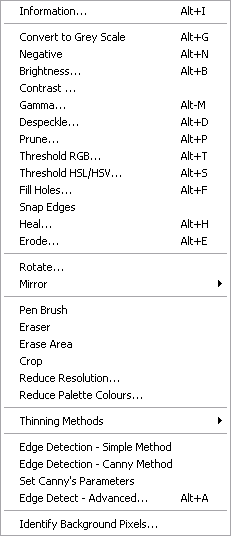
Convert to Grey Scale
Selecting this option will convert any colours in the raster image to the corresponding grey intensity.
If you are getting poor results from vectorisation of a image which has been scanned in colour, then you could try converting it to grey scale prior to thinning. The thinning methods may produce slightly different results due to their determination of which pixels are important and which are 'background'.
Thresholding...
Thresholding is very useful for isolating a particular colour, or range of colours, in an image. You may want to remove a particular colour range, or you may want to remove everything except a particular colour range. For example, if you are interested in only the red features of a colour image, you can use Thresholding... to remove all other colours from the image.
Selecting this option brings up a window which allows you to remove pixels from the raster which are above or below the threshold colour limits.
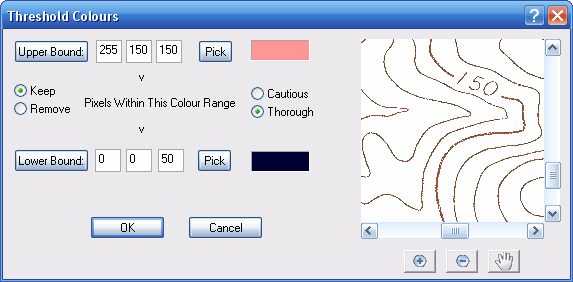
The window shows the Red, Green and Blue intensities of the the upper and lower thresholds.When you click OK WinTopo will remove pixels whose intensities are outside (or inside) of these limits.
If the Keep option is checked then the pixels within the threshold limits are kept, and all others are discarded (set to background intensity).
If the Remove option is checked then the pixels within the threshold limits are discarded and all others are kept.
Pressing the Upper Bound or Lower Bound button brings up a standard Windows colour selection dialog from which you can choose a colour for the particular threshold limit.
Alternatively, you can enter the Red, Green or Blue intensity (0 - 255) in the approprite number box.
Finally, you can press the Pick button to pick a colour value straight off the raster (not available on Freeware version). The cursor changes to a  until you click on a pixel. The colour of the selected pixel is used for the threshold limit.
You can choose whether to perform a Cautious or Thorough thresholding. The Cautious setting will remove less pixels than the Thorough setting. In most cases you should use the Thorough setting. This is now the default in WinTopo Pro.
Brightness...
Selecting this option brings up a window with a slider so that you can adjust the image brightness.

Moving the slider to the right makes all the pixels lighter, and moving the slider to the left makes all the pixels darker. The preview image shows the effect as you drag the slider back and forth. Pressing the OK button will perform the change on your image.
Altering the brightness of a raster image can have a dramatic effect on the thinning methods because it will change some pixels to background intensity, or vice versa.
Contrast...
Selecting this option brings up a window with a slider so that you can adjust the image contrast.
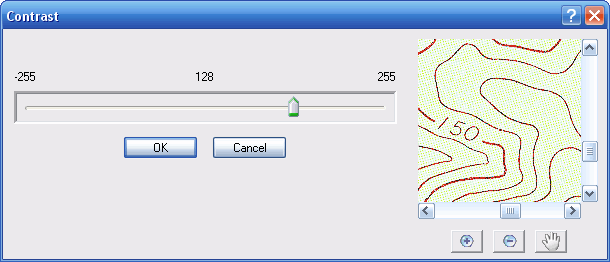
Moving the slider to the right makes all the light pixels lighter and the dark pixels darker - the image gets more intense. Moving the slider to the left makes the image less intense, resulting in a uniform mid grey at the extreme left. The preview image shows the effect as you drag the slider back and forth. Pressing the OK button will perform the change on your image.
Altering the contrast of a raster image can have a dramatic effect on the thinning methods because it will change some pixels to background intensity, or vice versa.
If you have an image with indistinct edges on lines then you can increase the contrast to make the edges more crisp. This can result in more desirable vectors after the vectorisation process.
Gamma...
Selecting this option brings up a window with a slider so that you can adjust the image gamma.
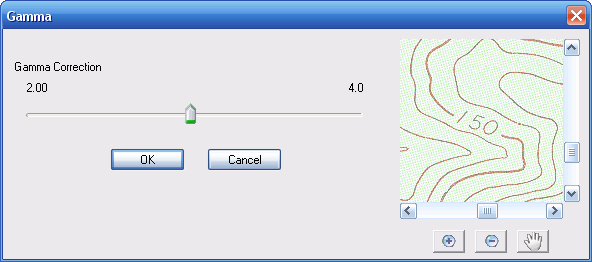
The Gamma adjustment affects the raster image's brightness and contrast in a single operation.
Increasing the gamma adjustment above 1.0 will tend to lighten midrange colours and grey shades, without changing the lightest and darkest hues so much.
Decreasing the gamma adjustment below 1.0 will tend to darken midrange colours and grey shades, without changing the lightest and darkest hues so much.
A gamma adjustment of 1.0 leaves the image unchanged. The Gamma window allows adjustment in the range 0.1 thought to 4.0.
** The following options are not implemented on the Freeware version **
Negative
This option changes all the colours in the image to their corresponding 'photo' negative colour. This is useful for a scan of a blueprint or other negative type original, where the lines are lighter in colour than the background.
 <---->
Also, this can be useful for the simple Edge Detection method when using a black and white raster - if you negative the image prior to performing the simple edge detection then you will get the outer edges of objects rather than the inner edges.
The negative operation is reversible. Selecting the option a second time will undo the effect.
Prune...
Selecting this option brings up a window which allows you to remove short lines which protude out of longer lines.
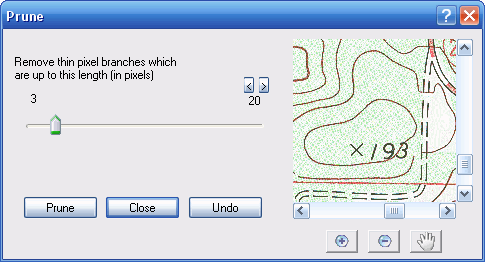
This option scans the raster for incidences of a short line of pixels which connects off another line. The short lines will be deleted. You can use the slider to select the maximum line length which you want deleted.
 |
Here is a magnified extract of a raster image, showing a vertical red line of pixels with two single black pixel lines on its sides. Also the line splits at the top into two lines of 3 pixels each. |
 |
This is the result of a prune with length set to 1 pixel. You can see that the two black side pixels have been deleted. |
 |
This is the result of a prune with length set to 3 pixels. You can see that the two braches have been deleted at the top. |
This is generally useful to remove imperfections from a poor quality scan.
Fill Holes
Selecting this option brings up a window which allows you to fill holes in solid items.
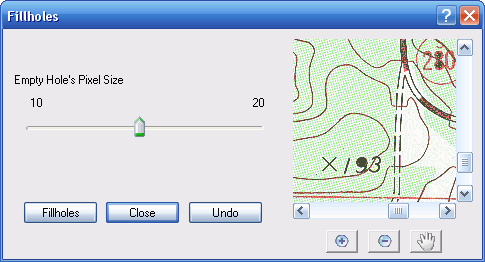
This options scans the raster for background intensity pixels surrounded by dark pixels. Holes up to the size specified by the slider get filled in with dark pixels.
Snap Lines
This option scans the raster for lines which stop and start with a gap of 1 pixel between the ends. WinTopo will add the pixel to close the gap and join the two lines.
This option often works best after thinning the raster.
Related Topics: