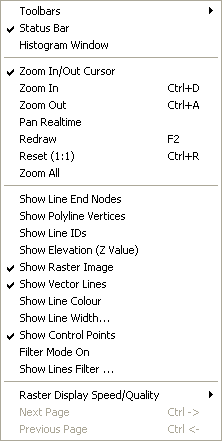
The following options can be selected from the View menu:
Tool Bar
This option selects whether or not to show the Tool Bar buttons.
The Tool Bar contains buttons for the most popular options from the menus.
Status Bar
This option selects whether or not to show the Status Bar at the bottom of the WinTopo main window.
The Status Bar displays information pertinent to options and progress.
Histogram Window
If this option is selected, WinTopo will show a small window with a graph of colour distibution for the raster image.
When the Histogram Window is displayed some of WinTopo's raster processing operations may appear much slower.
This is because WinTopo is regenerating the colour distribution graphs each time the raster changes.
Zoom In
WinTopo can magnify the raster image and vectors up to 512 times.
Selecting the Zoom In option increases the magnification.
Pressing
You can also Zoom In by clicking the left mouse button in the image when the
![]() toolbar button is selected.
The point under the cursor is moved to the centre of the window.
toolbar button is selected.
The point under the cursor is moved to the centre of the window.
If you have a mouse with a scroll wheel then you can zoom in by rotating the wheel towards you.
The magnification of the image is shown on the status bar at the bottom of the application window.
Note: In Windows 95, 98 and ME raster images may not be magnified as much as 512 times. This is due to limitations within these versions of the Microsoft Windows(TM) operating systems. In Windows NT, 2000, XP and Vista there is no such problem.
Zoom Out
WinTopo can reduce the raster image and vectors up to 512 times.
Selecting the Zoom Out option decreases the magnification.
Pressing
You can also Zoom Out by clicking the right mouse button in the image when the
![]() toolbar button is selected.
The point under the cursor is moved to the centre of the window.
toolbar button is selected.
The point under the cursor is moved to the centre of the window.
If you have a mouse with a scroll wheel then you can zoom out by rotating the wheel away from you.
Pan Realtime
You can pan the image by selecting this menu option, or clicking the
![]() toolbar button.
The button will stay depressed until you click it again to release the option.
toolbar button.
The button will stay depressed until you click it again to release the option.
When in Pan mode the cursor shows as a hand symbol and when you click the image and drag the mouse (keeping the mouse button held down) the image will get dragged too, so that the same part of the image stays under the cursor.
You can use the pan mode when working with other functions - for instance, digitising polylines. Click the pan toolbar button to pan the image, then when you click the pan toolbar button to leave the pan mode, you will be back in the previous function. You can also leave pan mode by clicking the right hand mouse button.
You can also pan the image at any time by holding and dragging with the middle mouse button. If your mouse has a scroll wheel, then hold and drag with the scroll wheel pressed down.
Redraw
Selecting the Redraw menu option, or pressing F2 on the keyboard,
causes the raster image and vectors to be refreshed in the window.
Reset (1:1)
This option resets the image magnification back to 1 (unmagnified).
This is useful before using File->Print... to send the image to a printer. This is because the current zoom scale
is used for the printout. A zoom scale of 1:1 will cause the image to fit-to-page.
Zoom All
This option zooms the image so that it is all visible within the view window.
This is useful if you want to quickly return from high magnification to see the whole image.
Show Line End Nodes
With this option selected, vectors are drawn with a symbol at the end of each polyline.
This can be useful for gauging the relative merits of varying the vector extraction options,
and when using the vector manipulation options.
Show Line IDs
With this option selected WinTopo displays the polyline identification number next to the middle of each polyline.
The polylines IDs are allocated sequencially during vector extraction,
the numbers have no significance other than to uniquely identify each polyline.
The IDs are used in the Show Lines Filter window.
Show Elevation (Z values)
(Not available in the Freeware version)
With this option selected WinTopo displays the polyline Elevation (Height/Level or Z value) next to the middle of each polyline.
The elevation can be assigned with the Assign Elevation facility.
Show Raster Image
This option selects whether or not the raster image is displayed.
You may wish to turn off the raster image to see the vectors more easily.
The ![]() button on the toolbar has the same function.
button on the toolbar has the same function.
Show Vector Lines
This option selects whether or not the vector lines are displayed.
You may wish to turn off the vector lines to see the raster image more easily.
The ![]() button on the toolbar has the same function.
button on the toolbar has the same function.
Show Line Colour
(Not available in the Freeware version)
When a raster is vectorised the vectors are normally displayed in green,
so that they show up against the raster background.
If you select the Show Line Colour option the vectors will be displayed in their actual colours.
Because the vectors are a very similar colour to the raster pixels,
the Show Raster Image option will be turned off, so that the vectors can be seen.
Show Line Width
You can use this option to set the line width for displaying the vector lines.
See Line Width for more details.
Filter Mode On
When this option is selected WinTopo will display only the polylines which have been selected in the Show Lines Filter window.
Show Lines Filter
This option brings up a window which allows you to specify the Line IDs of specific polylines. When the Filter Mode On option is in operation WinTopo will display only the polylines whose IDs are specified on this window.
To see the polyline IDs, turn on the Show Line IDs option.
Related Topics: